FACE SHAPES:
Knowing the shape of your face can help you decide which haircuts will look best on you and how to apply your makeup to the best effect. Here are the most common face types and what they look like.. you'll have to figure out which one best suits you by yourself. (hint: drawing shapes on pictures of your face might help you.. like the ones seen below!!)
- Oval Face - This is the equivilant to an hourglass body shape - every makeup style tries to create the illusion of having an oval face. You will know if you have an oval face if your forehead and your jawline are equally rounded and narrower than the full length of your face. The oval face shape suits any hair style - long, short, medium, layered, straight or curly. Bangs can be added to emphasize the eyes or add a little change, depending on your type of hair. Celebs with oval face shapes: Jessica Alba, Kate Hudson, Beyonce Knowles, Charlize Theron
- Round Face - A round face is as wide as it is long, with rounded edges. The nose is the center guide. To slim the face, hair styles should be kept close tot he sides of the face, while adding height and volume at the crown, and having along length. Celebs with round faces: Cameron Diaz, Kyra Sedgwick, Penelope Cruz, Mandy Moore, Kate Winslet, Gennifer Goodwin.
- Square Faces - You will have a square face shape if your face is as wide as it is long, with strong angles. You will have a defined jaw and a straighter hairline. The best cuts for square faces have layers and wispy bangs. Celebs with square faces: Demi Moore, Gwenyth Paltrow, Geena Davis, Sandra Bullock.
- Heart-Shaped Face - The heart-shaped face is wide in the eye and cheekbone area with a narrow or pointy chin. Many also have a high forehead. Best hairstyles for heart shaped faces have long, wavy layers and sideswept bangs. Celebs with heart-shaped faces: Reese Witherspoon, Jennifer Garner, Katie Holmes, Jennifer Lopez, Brittany Murphy, Scarlett Johannson.
- Long Face - Long faces are quite narrow and oblong, often with a larger chin and high cheekbones. To style hair for long faces, make sure you have a medium-length cut with lots of layers, and try big curls to add fullness to your face. Celebs with long face shapes: Hilary Swank, Sarah Jessica parker, Ashlee Simpson, Liv Tyler.


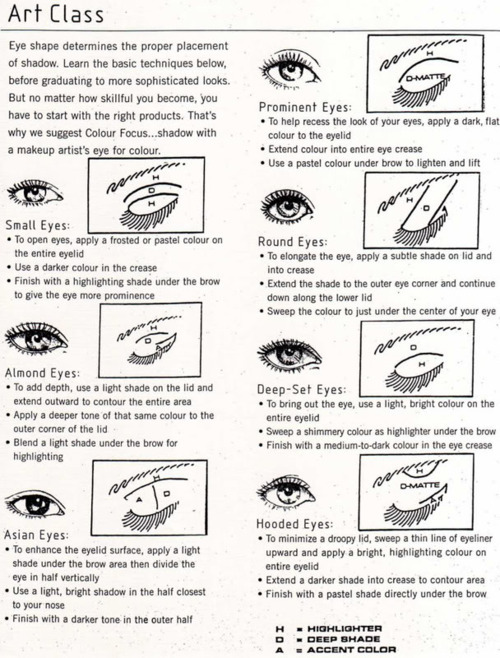
EYE SHAPES:
Ever wonder why some eyeshadow looks don't look as good on you as they do on the model you initially saw them on? It could be because you have different eye shapes! The shape of your eye dictates which part of your lid that you see, and since makeup is all an optical illusion, the way you apply your shadows and liners could change the way your eyes look completely! Here is an exerpt from a cosmetologist handbook, with different eye shapes and the way eyeshadow should be applied to each of them!! (Super Helpful!)
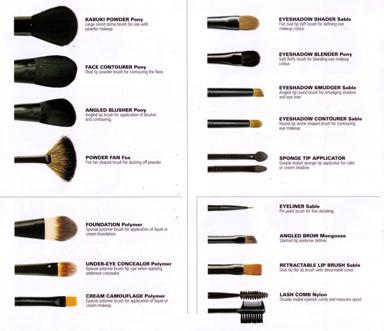
BRUSHES
These are girl tools - the hammer, saw, and screws of building a flawless, more natural makeup look that enhances your natural beauty rather than caking it on. Nothing could be more confusing, however than picking up a brush and trying to figure out what it is supposed to be used for. Here are the most popular brushes and what they're supposed to do:
Makeup Brushes should be cleaned every week or so, depending on how often you use them. You can purchase bottled brush cleaner, however most often these contain 99% alcohol, which will ruin your brushes if yours are higher quality and natural hair. Another method of washing your makeup brushes is to use baby shampoo with warm water - baby shampoo is gentler than most soaps but still cleanses. I like to use vegetable oil mixed with warm water - it's very kind to your brushes, and since water and oil don't mix, the combo will rinse all the gunk right out.
You should toss your makeup brushes once the hairs/bristles start to break off or become splayed and/or stiff.
EYEBROWS
We'll start with the basics, the foundation of your face. I'm a firm believer in the fact that your eyebrows frame your face and pull your whole look together - and I envy girls with strong eyebrows, because mine are not. However I do pencil mine in every now and then when I'm wearing a heavier makeup look - but eyebrows should always look natural and be within three shades from your hair color.
- Plucking - Use tweezers to easily shape and maintain your brows between salon visits or everyday. Your brows should begin a pencil's width from your nose, and end a pencil's width from the outside corner of your eye. When plucking, you should always follow the natural shape of your brow - do not try to make it angle or arch a certain way, because you'll end up over-plucking and making a big mess of your face. $FREE
- Waxing - This can be done personally in your own home or by a professional in a salon, which is one of the benefits of this procedure. Although it does hurt, it is the fastest and most precise way to shape your brows. It lasts about as long as a traditional plucking, but you never have the worry of messing it up or making your brows uneven. However, those with thin brows shouldn't wax, because waxing makes your hair come in thinner. $5-$15
- Threading - This can be done by a professional in a salon, and is a process where small strings are used to pull hair from the root - like a fancy, precise plucking. It hurts quite a bit depending on your pain tolerance, and takes around 3 minutes to complete. $8-$20
FOUNDATION
This is a scary thought for those with even skin, and an absolute must for girls with blemishes. However, there is a kind of foundation that is right for every person and every skin type. It truly is the building blocks of every makeup look, and can give you that perfected look you've always dreamed of.
- Liquid Foundation - There are hundreds of different liquid foundations out there, and all of them have different formulas, tints, and sheens that can determine how they look on your skin. Thicker foundations are better for people with blemishes, or who would prefer more coverage; thinner foundations are better for those who have nice skin and like a lighter feel on their skin. However I would suggest liquid foundation to everybody, because it is easiest to apply and almost always looks natural, because it is easy to blend in.
- Powder Foundation - Powder foundation can come in pressed compacts or loose jars and are applied with pads or puffs to the skin. These are good for those with oily skin - you can even get translucent powder, if you have clear but oil prone skin, that will look bare but keep your face perfect. These are easy and quick, however they can look unnatural if applied hastily or if you have the wrong shade for your skin tone.
- Cream Foundation - Mousse, cream - it's all the same when it comes to your skin - same coverage (full) and it lasts a long time. However, these will clog your pores and make you more oily if that's a problem for you. These are great for girls with minimal breakouts and dry skin.
- Tinted Moisturizer - This is great for people who don't want the look of makeup, but want to add a little glow to their complexion. Most come with SPF, antioxidants, or some other skin-nourishing additive, and give you a dewy, sun-kissed glow. If you have acne-prone or oily skin, this might not be the best choice for you, and this has minimal coverage.

Any type of foundation could be applied with a sponge, a brush, or your finger tips. Liquid foundation and tinted moisturizers are the most universal - most apply this with their fingertips, but there are wedge-shaped sponges designed to blot on foundation in concentrated places, and there are also foundation brushes (they look like an artist's paint brush, though large), which most cosmetologists suggest using. Your fingers can spread bacteria around your skin, causing acne - but so could overused brushes or sponges, if you don't wash or dispose of them enough. Powder foundation normally comes with it's own little sponge or puff - these cause the powder to go on thickly and unnaturally. I suggest using a powder brush - a big fluffy one - to apply powder thinly. This will absorb oil, go on even, and eliminates the bacteria issue. Cream foundation is easiest to apply with your fingers, since they most often come in a small pot or jar.
Foundation should be discarded every 8-12 months, unless you use your fingers to dip into the bottle/jar - then it is recommended that you throw it away after 6 months to prevent the spread of bacteria. Powder lasts 1-2 years.
CONCEALER
For those of you with undereye circles, scars, or blemishes that just won't cover with regular foundation, concealer will be your best friend. Typically, concealer is just a thicker formula of foundation (in fact - simply using the dried residue on the inside of your foundation cap works as amazing, perfect-matching concealer!). TIPS:
- Apply Concealer AFTER Foundation! Otherwise you're just wiping off all your concealer when you apply foundation.
- Use a concealer ONE SHADE LIGHTER than foundation - just one!! any lighter or darker, and you'll be highlighting your blemish rather than concealing.
- When covering acne - use a makeup sponge or a spare eyeshadow brush, making sure it is squeaky clean! Try to use a MINERAL concealer or one that specifically works to clear acne, because most concealers will make acne worse (horrid, I know.)
You should discard any leftover concealer after it is 10 months old, or 6 months if you dip your fingers directly into the jar/bottle.
BLUSH & BRONZER
Especially if you use foundation of any kind, you need to apply either blush, bronzer, or both to add a natural flush to your face. Depending on your skin tone and the overall makeup look you're trying to achieve, there are various colors and strengths that are best.
- Powder Blush - Easy to apply with a large blush brush, should only be lightly on the apples of your cheeks - not too bright, and not too much. The point of blush is to make you look flushed and natural, not like a porcelain doll.
- Powder Bronzer - Should be applied where the sun would naturally kiss your face; in the sallows of your cheeks for contouring, along your browbone and the ridge of your nose. This should not be applied so that it looks streaky or too much darker from your natural skin color - blend blend blend! Bronzer can also be brushed along your collarbone or cleavage to define your 'features'.
- Cream Blush/Bronzer - Should be applied only to the apples of your cheeks and blended well into your existing foundation. If you are prone to acne, you shouldn't use creamy products - stick to powders, which are kind on every type of skin.
- Blush/Bronzer Palettes - These come in a pressed powder form, and can be very pretty and quite handy in a pinch. These come with various shades of blush or bronzer, light and dark, so that you can customize the intensity of your look as you see fit. These are great for contouring, and are ideal for a natural look.
Powders can last up to two years, after which you should discard it. Creams last about a year, unless you use your fingers - then you should throw it out after 6 months!
EYELINER
Almost everyone I know wears eyeliner in some sort of way as their everyday go-to look. Lining your eyes is the ultimate way to get definition and to really make your peepers pop! However there are many different ways to line your eyes, and it can get tricky - depending on the look you're going for.

- Pencil Liner - This is the most common type of liner, because it is portable, easy and quick to apply. You can get these in almost any color, at any price point - but they are all designed to do the same thing. These are easiest to line the inner rims of your eyes, and are good to blend if you are going for a smokey look.
- Crayon Liner - These liners are retractable pencils, but they do not need to be sharpened. They work much the same as traditional pencil liners, but they tend to have a little bit of a sharper line. These are good if you are trying to make a very thin line in a very short amount of time.
- Liquid Liner - Liquid eyeliner is scary for most people until they actually start to use it. The technique is difficult to master at first, but once you get the hang of it, your eyes will really reap the benefits. Liquid gives you the most precise line possible, and goes on smoothly without a hitch. The easiest way to apply it is to draw a couple of dashes across your upper lash line, and connect them, creating a smooth, perfect line. You'll need a steady hand, but this is the easiest way to get a classy lined eye.
- Gel Liner - This is the newest type of liner, and it's definitely one of the best. It is somewhat of a hybrid between a pencil liner, a liquid liner, and eyeshadow. It is a creamy formula that you apply with a tiny liner brush, and gives you a very precise line without the stress of getting a perfect liquid line. Gel liners last a long time, like liquid liners, but they are still blendable and customizable like the pencils.
Pencil liners, when sharpened regularly, can last up to 3 years. Liquid liner should be tossed after 6 months maximum.
LASHES
Mascara is normally either the finishing touch or the mandatory product; it enhances every look and makes you look wide awake, fresh and beautiful. However - not all mascaras are made alike, just as all eyelashes are not made alike. There are so many different formulas, brushes, and brands of mascara out there that it can be nearly impossible to find the perfect one for you. Thats why I suggest - mix and match! Experiment! You can never have enough of these cute little tubes.
- Lengthening Mascara - Normally, lengthening mascara is going to give you long, defined lashes instead of fullness. However, some lengthening mascaras will clump easily, so I would not suggest using an eyelash curler with this type of mascara. This type is good if you have short or light-colored lashes.
- Thickening Mascara - This type is meant to give you thicker, fuller lashes and a bolder eye. You don't have as much of a problem with clumps, so go ahead and use your curler. If you want drama and lushness, this is the kind of mascara for you.
- Small Mascara Brushes - These are better for lengthening and defining, and are great for your lower lashes because you don't have a big bulky brush smearing mascara everywhere. If the brush has short bristles then it will be a better brush because it will apply more evenly and reduce clumps.
- Big Mascara Brushes - Designed to give you fuller, bigger lashes, these brushes can cause more smearing, especially if it has long bristles. However if you make sure to wipe off most of the formula from the brush, you'll find that these types of brushes will give you crazy long lashes.
In order to avoid clumps and to achieve the most natural-looking, fullest lashes, you should take these steps when applying:
- Begin with a volumizing mascara. Wipe most of the excess off of the wand, so the brush looks almost clean. Wiggle the wand at the base of your upper lashes (with your eye open) without actually sweeping the wand through to the end. This will separate your lashes perfectly and keep them plump and full the whole day.
- Next use a lengthening mascara, wiping off most of the excess formula. Close your eye most of the way, and sweep the wand down the top of your upper lashes (the side you don't normally put mascara on). Wait a few seconds for the mascara to dry so you don't get spots on your eyelid. Then, open your eye and sweep the mascara through again, the normal way. This way, your entire lashe will be covered, making them look longer and more dramatic.
- Finally, use either mascara (depending on how full you want your lashes to be) and simply pat your bottom lashes until they are covered in mascara - not too hard, or you'll smear it all over your bottom lid, making it look runny and messy. Do not sweep the mascara through the lengths of your bottom lashes, or you'll get a spidery, uber-Twiggy effect (which, unless you're trying to look like Luna Lovegood, is not the sexiest look.) Now you're finished!! Bat those sexy things ;)

- Eyelash Curlers - These scary devices look tricky, but when used properly they can really enhance the look of your lashes without using tons of mascara. It is better to curl your lashes before applying the rest of your eye makeup, because mascara could cause your lashes to stick to the curler and pull. Be very gentle when curling because if you do it too much and too vigorously, you could cause your lashes to grow in smaller and more sparsely.
- False Lashes - Most people think falsies are only for clubbing and photo shoots - but you'd be wrong. There are many great, inexpensive and natural-looking lashes out there that are perfect for everyday use. In most cases, you really just have to try them out and see what they look like before you know what length and thickness is right for you... (that sounded kind of dirty hahaha). The trick is to apply a very thin line of glue on the lash, wait 10 seconds for it to get tacky, and then hold it directly against your lash line for 30-45 seconds, making sure it doesn't stick to your fingers. It takes practice, but once you master it you'll be able to pull off a truly stunning look. Once the the falsies are applied and dry, you can curl them or even add mascara to shape them how you want them.
Mascara should be thrown away every 3-6 months, otherwise bacteria could begin to grow inside the tube that could be transferred to your eyes!
EYELIDS
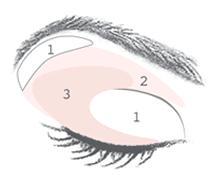
Whether you love bold, bright eyeshadows, prefer a sexy smokey eye, or you're more of a natural girl, every time you close your eyes, some kind of impression is going to be made. You can either change your whole look, or simply enhance your natural beauty, simply by swiping on a shade or two (and lets admit it.. playing with eyeshadow is fun!) However, you've got to be careful to make your eyeshadow look classy, not trashy, and not like a little kid did it. Most eyeshadows come with a diagram on how to apply color, but sometimes the terms get a little tricky to understand.
- Brow Bone - When it comes to applying eyeshadow, this term refers to the place right underneath your eyebrow. Normally this is where the lightest, or highlighting shade will go.
- Inner Corner - This is the part of the eye closest to the nose, where your tear duct is. This is also the place where you should apply highlight.
- Outer Corner - The outer corner (part of the eye farthest from the nose) is where most of your shadow will be placed, since it connects to your crease and your lashline.
- Lid - When you are applying shadow, your lid is simply the part of your eyelid that covers your eyeball (difficult and weird to explain), the part that rounds out.
- Crease - This is the part of your eyelid that sinks in, between your eyeball and your brow bone. The darker colors normally go here, and help contour your eye to make it look sexiest and defined.
- Lashline - Your Upper or Lower lashlines are closest to where your lashes grow from. The darkest shade of shadow or eyeliner will go here.

Here are a few of the most popular looks, and a general way to achieve all of these:
- Natural Girl - For when you're running out of your dorm for your 8:00 class, bumming around the house on the weekends, or you simply prefer to flaunt what god gave you, this look is for you. If you hate the idea (or don't have the time for) eyeshadow, make sure you at least sweep a little foundation on your lids. I've seen too many people walking around looking crazy because they didn't put their makeup on their eyes. If you just want to look like your pretty, natural self (but aren't opposed to a bit of glimmer) invest a few bucks into a light, shimmery gold shadow that you can just sweep over your entire lid. In any makeup look, light shadow should be swept under the eyebrow and on the inside corner of the eye - this makes your eye look brighter, resulting in you looking more awake. White or nude eyeliner will do a similar thing. Pair this with a bit of eyeliner or mascara, and you've got a pretty, effortless look for every day.
- Everyday Sexy - To pull off this look, you just need to have a two- or three-color palette of a matte or shimmery eyeshadow, and you have to be able to accept a little bit of attention (because you're going to look HOT.) The best color palette for this is brown, but grey/black, purple, blue, pink, or dark green work as well. Find a color that really compliments your eyes and skin - not too bright or clownish. This is meant to be neutral and to enhance your beauty, whatever you plan on doing. First, take the lightest color in your palette (make it very light) and sweep it all over your lid, under your brow, and on the inside corner of your eye. Next, take the darker color and sweep it in a c shape through your crease to the outer corner, and down the upper lash line. For a little extra drama, take the middle shade and smudge it on the outer half of your lid to your liking, being careful not to go much higher than your crease. This will look like a miniature smokey eye - not as intense, but just as sexy. Top off with eyeliner and mascara, and you're good to go - to class, to the mall, to the club, or wherever your heart desires. You're gonna look fierce.
- Bright Shadow - This look takes a bit more confidence, but is a lot more fun. You should try to get the color in a two- three- or four-color palette, or find a single shade and a highlight color to go with the look. Highlighting is the key to making this look natural, and not like a little kid playing with mommy's makeup. First, sweep a light nude or complimenting shadow all over your lid, under your brow, and on the inside corner. Then take your color of choice, and sweep it lightly over the lid, not going over the crease much, but just beyond the outer corner of your eye. If you have a darker, contouring color in your palette, you should apply this to the crease of your lid, and along the upper lash line to your taste. This look can either be very bold or very light and tasteful - experimenting is the best way to master a bright shadow. You should avoid glittery shadows when going colorful, because you will get a clown-like (or 11-year-old-like) effect, which isn't exactly going to make the boys/girls come running. You should never wear a bright lipstick or a lot of blush with a bright eyeshadow look, either - try a nude lipstick or just lip balm/clear gloss, and a minimal amount of pink blush or bronzer. The focus is going to be on your eyes, and you're going to want to own it.
- Smokey Eye - This is one of the most popular makeup looks, if the most dramatic and eye catching. This requires a full palette (three or four shades), a lot of confidence, and a suitable occasion. Use a highlighting color under your brow and on your inner corner to open up your eye. Then take the next shade darker, and cover your lid, crease, and wing out slightly at the outer corner. Now take the third darkest color and apply to the crease and the outer half of your lid. If you have a fourth color, also add this to the crease (making the c shape around to your lashline as well.) Use the darkest color to line your upper AND the outer half of your lower lashline. Make sure you blend the colors together well. This shadow looks best with liner on your upper and lower lashline, and mascara on both upper and lower lashes as well. This is a heavy but super-sexy makeup look, and works best with darker colors.
Powder eyeshadow can last up to two years, after which it should be thrown away. Cream eyeshadow should be tossed after one year.
LIPS
Your pout, other than your eyes, is the feature that others will be most drawn to. For this reason, you've got to make sure that, no matter what look you're going for, your lips are sexy and sweet. There are so many lip products out there, it's easy to get confused as to what's best for you. Here's a breakdown of them all:
- Lip Balm - It's not called "chapstick" - that's a brand. It's lip balm, and it's easily your mouth's best friend. Lip balm not only moisturizes your lips and keeps them from getting chapped, but it makes you easier to kiss and can even prevent diseases. You should always be wearing lip balm, even under your other lip products. Most come with built in SPF and vitamins, so you can't go wrong. Plus they're portable and easy to slick on during any activity! Unfortunately, they're just as easy to lose.
- Lip Gloss - Whether you're going out to a fancy dinner, or you're just headed out to the grocery store, over 50% of American women between the age of 13 and 25 slick on lip gloss every day. You can get clear or colored, scented or flavored. Sometimes these get sticky, and they're nearly impossible to kiss with unless you don't mind giving your subject a shiny insignia.
- Lip Stick - As scary as lip gloss is for the over-40 set, lipstick is generally just as frightening for the under-25's. However, lipstick is universal, classy and flattering. The original symbol of a sexy woman was a brigth red pout, and it still is today. However nowadays, lipsticks come in hundreds of brands, colors, and formulas, from sheer bubblegum pink, to shiny lustrous coral, to classic matte red. Most often lipstick is worn on special or professional occasions, but it should definitely be an everyday staple as well.
- Lip Liner - Modern makeup-doers think of lip liner and cringe, because the typical image is over-drawn fake looking clown lips, or dark brown liner on nude lips (ew!) Today, lip liner is used best for girls with very thin lips, or wrinkles around the mouth - go for a nude stick, swipe it around the borders of your mouth, and then add a pretty lipstick. The lip liner will make sure your color doesn't run.
When doing a strong, bright lip look, you should go easy on your eye makeup. If you go big at both focal points, you'll quickly look overdone. It is better to highlight one feature at a time to look kissably gorgeous.
Lipstick can last for 2-3 years before it should be discarded - lip gloss, 2 years max. Lip liner should also be used for two years maximum.